
 Left image: Original
Right image: Manipulated photo
In our very first lesson of media, we were put into groups and asked to take photos around school. We were given set topics to photograph. The photo on the left is based on the topic of "fashion model". We were asked to take a photo of someone in our group and then manipulate the photo to make it look like an actual fashion photo.I took this photo against a white background, so that if i wanted to maniuplate it or change the background it would be a lot easier than photographing someone against a patterned background. I deliberately placed the model to the right so i could put the fashion brand logo at the bottom let corner of the image. Our eyes naturally travel in a C shape so the first thing you would see as your eyes travel down the page would be the logo and then the model. I opened the image in photoshop and began to edit the image above.
 Step 1.
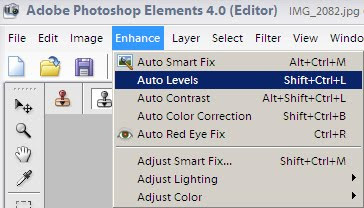
I opened up photoshop and clicked enchance, auto levels. This changes the white and black balance of the image automatically. Automatically means the computer changes it rather than you yourself. In my opinion this looks a lot better than editing the levels yourself.
 Step 2.
I then clicked enhance, auto contrast. Auto contrast adjusts highlights and shadows in the picture automatically using the computer's judgement. Auto contrast also preserves the image's detail whilst adjusting the shadows.
 Step 3.
In our very first lesson of media, we were put into groups and asked to take photos around school. We were given set topics to photograph. The photo on the left is based on the topic of "fashion model". We were asked to take a photo of someone in our group and then manipulate the photo to make it look like an actual fashion photo.I took this photo against a white background, so that if i wanted to maniuplate it or change the background it would be a lot easier than photographing someone against a patterned background. I deliberately placed the model to the right so i could put the fashion brand logo at the bottom let corner of the image. Our eyes naturally travel in a C shape so the first thing you would see as your eyes travel down the page would be the logo and then the model. I opened the image in photoshop and began to edit the image above.
 Step 1.
I opened up photoshop and clicked enchance, auto levels. This changes the white and black balance of the image automatically. Automatically means the computer changes it rather than you yourself. In my opinion this looks a lot better than editing the levels yourself.
Step 2.I then clicked enhance, auto contrast. Auto contrast adjusts highlights and shadows in the picture automatically using the computer's judgement. Auto contrast also preserves the image's detail whilst adjusting the shadows.
 Step 3.
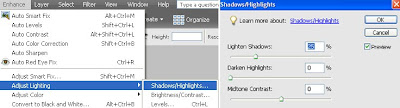
I then clicked enhance, adjust lighting, shadows and highlights to adjust the lighting of the shadows/highlights manually. This allows me to edit the image rather than the computer editing it. I turn the lighten shadows button down to zero so there are more shadows in the image, making it look more professional. I then move the midtone contrast up to incease the sharpness of the image.
 Step 4.
 Step 4.
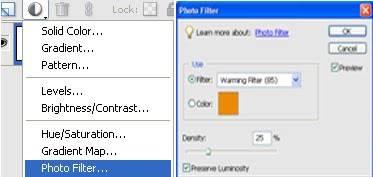
 I then added 3 photo filters. First i added a yellowy green colour to make the photo look natural. I then added an orangey colour to make the model look a skin shade darker, and finally i added a black filter just to drain some of the colour out. I think overall the pictuer above does look quite professional after manipulation.

Left image: manipulated photo
Right image: original
I used the same techniques on this image. I used auto levels to alter the black and white balance of the image, i used auto contrast to so the computer would edit the contrast to avoid human error, i then edited the shadows to make the picture brighter, and made the levels darker to make the image a lot bolder.
I then added 3 photo filters. I added orange to give the image a natural glow, a yellowy green to give the image a natural feel, and black to make the image a lot bolder.
I then added 3 photo filters. I added orange to give the image a natural glow, a yellowy green to give the image a natural feel, and black to make the image a lot bolder.

No comments:
Post a Comment